Happy Sunday!
I hope you've had a great weekend so far!
I shared this "Masterboard" post on The Rubber Cafe Design Team Blog last Wednesday but I wanted to share it with all my blog readers too! You may have also heard this technique referred to as a "One Sheet Wonder" which is how I first heard of it.
A stamping "Masterboard" is creating a collage starting with a plain piece of card stock and layering with with stamped words and images. When you are done creating your "masterboard" you can cut it apart and use it to make a bunch of coordinating cards. I made eight cards out of my "masterboard".

Don't worry....I'm not just going to leave you with a picture and run! I will show you how to create a beautiful "masterboard" so that you can create a coordinating card set too!
It's easy and fun!
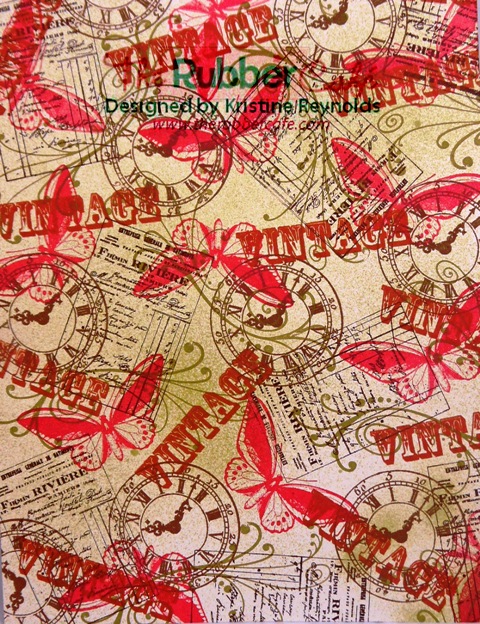
To make my "masterboard" I started with a piece of Cream Pugnacious Signature Paper.
I used images from Flueradidy 2 and Vintage Treasure.
I used images from Flueradidy 2 and Vintage Treasure.
I stamped the Vintage Receipt image in dark brown chalk ink. In order to create a random pattern be sure you stamp some images off the page and change directions of the image.

Next, I stamped the clock image in Chestnut Roan chalk ink. I forgot to take a picture before adding the butterfly in Rouge chalk ink but you get the idea, right?

I wanted to fill in some of the blank spots and soften it up a little bit so I added the Flueradidy 2 image in Dark Moss Chalk ink.

The next step was to add some words so I chose the Vintage sentiment and randomly stamped it on my "masterboard" in Burnt Sienna chalk ink.

At this point the cream paper was still a little stark for the vintagey feel that I was going for so I grabbed a bottle of Willow Tsukineko Walnut Ink and sprayed the paper a few times to complete the "masterboard".
The next step was to cut my board apart in to different pieces. There is no set way to cut it apart. I like the challenge of just cutting different pieces and then figuring out a way to use them. Here are the pieces I ended up with before assembling my cards.

I am not going to go step by step on how I made the cards since this challenge is really about creating the patterned paper but here's a closer look at the 8 cards that I made. You can probably figure out how I made them but if you have any questions at all please leave it in the comment section.
I used the Thank You 2 stamp on the completed cards.


Project Supplies:
Stamps by The Rubber Cafe:
Paper:
Bazzill Basics Cardstock Suede Brown Medium & Dark
Ink:
Clearsnap Fluid Chalk ink
Other:
Prima Mktg flowers
brads
EK Success & Martha Stewart border punches
Spellbinders dies
I hope you enjoyed my "Masterboard" project and I hope you'll give it a try too!
Kristine
1 comment:
Stunning selection of cards Kristine.
luv
Debby
Post a Comment