Hello Rubber Cafe' Fans!
I am so excited to share some fun cards that I made with this month's Creative Cafe' Card Kit and the add on stamp set, Feeling Lucky.
Here they are!!!
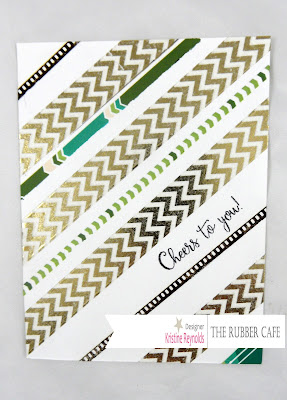
That amazing gold chevron Washi Tape on both of the cards comes with this month's Creative Cafe' Card Kit, I thought it would be fun to share some great ways to incorporate washi tape on your projects.
For the "Cheers" card I started by adhering a strip of Queen & Co. Washi Tape diagonally across a 4" x 5 1/4" white panel of cardstock. Then I added one of the stips of Rub on stickers from the kit above the washie and I stamped the sentiment below the washi tape with Memento Tuxedo Black dye ink.
I continued to alternate washi tape and rub-on strips until the panel looked like this.
I adhered the panel to a 4 1/8" x 5 3/8" piec of green patterned paper with Scrap Happy Glue and then adhered it to a beige card base that measures 4 1/4" x 5 1/2".
The final step is to stamp the beer glass on a white scrap and color with colored pencils.
Then cut it out and adhere to the card with a 3D foam square.
For the other card I started with a 4" x 5 1/4" panel of white cardstock and added the strips of Washi Tape.
I stamped the sentiments and lips with colored ink that I had in my stash.
Then I stamped the leprechaun on a white die cut oval panel and colored it with colored pencils.
I backed the oval with a yellow die cut panel and then a green scallop edge oval and adhered it to the card with Scrap Happy Glue.
I hope this post gave you some fun ideas to try with your washi tape.
I just love how these turned out!
Supplies:
Paper: The Rubber Cafe' KOTM--BoBunny Calendar Girl, Bazzill Cardstock
Ink/Color: Black Tuxedo Memento ink, Lipstick and LIme Clearsnap chalk ink
Adhesives: Foam squares; The Rubber Cafe'-Scrap Happy Glue
Embellishments: Queen & Co. Washi Tape, Bo Bunny rub-on stickersTools:Spellbinder classic oval and scallop oval diies.


1 comment:
Love both your cards...thanks for the inspiration!
xxx Margreet
Post a Comment